Showing posts with label easy. Show all posts

Friday, February 17, 2012

Lovely Bow Tutorials

Hey Lovelies!  How was your Valentine's Day?  I hope it was extra sweet!

I made a bunch of baby headbands for baby Ivy-- and I think a bow would be adorable on one.  I can also think of a certain pup who would look dapper with a bow-tie on his collar.  I've been collecting tutorials on bow making and am sharing them with you today.  Enjoy!!!
Hair Bow Tutorial via Natty By Design
Crocheted Hair Bow Tutorial via Happy Together
Zipper Bow Tutorial via Handmade by Funny Rabbit
Medallion Bow via Martha Stewart (click "next" to see the tutorial)
How to Make Hair Bows via A Beautiful Mess
Felt Bow Tutorial via The Moonlit Nest

More Great Bow Tutorials:

Felt Bow Tutorial via Sew Gorgeous
Ribbon Clippies Tutorial via What Happens at Nap Time
Quick and Easy Hair Bow Tutorial via {my friend} Earl-Leigh Designs
Pinwheel Bow Tutorial via Make Bows and More

Wednesday, January 4, 2012

Felt Rose Tutorial

I promised to post a tutorial showing you how I make my felt roses.  I know there are a lot of tutorials for making felt flowers out there-- but I wanted to make my mine because it's so easy!  No downloadable templates, no tracing on felt... 

You will need:
1 sheet of felt for your flower
1 sheet of felt (or scraps) for your leaves
Hot glue gun
Scissors

First, take your felt and fold it in half (hamburger style).  Fold it in half again.  Cut down the folds so you have 4 long strips and then make 3 cuts, yielding 3 sets of squares and a skinny rectangle.  
 From your squares, cut 9 circles.
Cut around the edges of 8 of your circles to make a scalloped edge.  Trim the edge of the 9th circle to make it a bit smaller-- this will be the base of your flower.  Grab your skinny rectangle too.
 Fold your scalloped circles in half, and then half once more.  Snip a tiny bit off of the tips.
 Using hot glue, glue 4 folded, scalloped circles to the base of your flower.
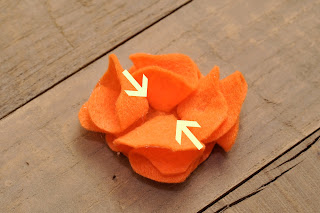
Glue 2 more folded, scalloped circles to your flower-- opposite of each other along the seams of the base petals.
Take your rectangle and snip off one top corner.  Fold down the other top corner 
  Roll it up-- rolling the folded side first and the cut corner will be on the outside.
 Glue the base of the roll up to the center of the flower.
 Glue the last 2 petals down in the space remaining.
If you feel your flower needs a little perking up in places, you can use tiny scraps of your felt to add some extra oomph!
Hope you enjoy making your felt roses!  Click here for more felt flower tutorials.  

Monday, December 26, 2011

Christmas Ornaments for Kids Tutorial

I just got home from spending Christmas with my family in the north woods.  It was so wonderful to be together for the holidays!

My family waited until I got there to pick out a tree and we decorated it together.  I love seeing all of my ornaments from when I was little.  I know Christmas is over, but I wanted to share a couple ornaments I found that I had crafted when I was young.
This adorable bird nest ornament is super easy to make with your kids.  As I've mentioned before, my mom is pretty crafty and I made this ornament with her a long time ago.  You can find all of the materials at the craft store, but you might need to stop by the grocery store for the cinnamon sticks.  

You will need:
6 cinnamon sticks
Ribbon
A cute tiny bird
Nest materials-- you could use mossy stuff from the craft store, twigs, raffia, shredded paper, etc...
Dried flowers
Glue -- hot glue works great!

1.  Glue your cinnamon sticks together to form a house shape.  Make a square with 4 sticks and then use 2 to create a triangle on top.  
2.  Form a nest with your nest materials.  Glue it to the cinnamon stick house.  
3.  Glue your bird in the nest.
4.  Decorate the nest and cinnamon stick house with dried flowers and a ribbon.

Isn't this little nutcracker ornaments so cute?!  I'm pretty sure he's my handiwork.

To make the nutcracker ornament you will need:
1 Old fashioned clothes pin
Paint
Fine tip Sharpie marker
Black pom pom
2 Wooden matches
Thread or ribbon for hanging the ornament

1.  Glue 2 matches to the sides of the clothes pin for arms.
2. Paint the clothes pin to look like a nutcracker-- black pants, red shirt, gold belt and buttons, and whatever color skin and features you like.  A fine tip Sharpie marker would be great for the eyes and mouth.
3.  Glue the pom pom on top of your clothes pin.
4.  Glue thread or ribbon to the back of the ornament to hang on the tree.
 
Fashion Trend © 2011 | All Rights Reserved | About | Privacy Policy | Contact | Sitemap