Showing posts with label crafting. Show all posts

Monday, March 26, 2012

Weekend Update + Shine Project Giveaway

Happy Monday!!!  How was your weekend?  I was DIY-ing up a storm this weekend and can't wait to share some exciting projects with you!
You might not know this about me, but I'm obsessed with ice cream!  I look forward to my weekly ice cream adventure with excitement all week!!
My goal is to eat my way around the best and cutest ice cream parlors of South Florida.   This weekend John and I went to Sprinkles in Palm Beach.
Sprinkles won Best Ice Cream from People Magazine in 2003 and is a favorite spot of Jimmy Buffett, Donald Trump, and Susan Lucci.  I ordered peanut butter cup ice cream in a chocolate and Heath bar dipped cone!  It was amazing!
Here's to another great week!  xo, Ashley
P.S. Have you seen my giveaway on the Shine Project?  If you haven't heard about the Shine Project you should check it out! 

Monday, January 2, 2012

Martha Monday: 2012 Thank Yous

HAPPY NEW YEAR!!!  Hope you had a fantastic time ringing in the new year!  On NYE John and I drove up to West Palm Beach and enjoyed the best fireworks show I have ever seen in my life!  It was magical!  

Yesterday we went out to watch the Marquette game-- and I drank way too much Diet Coke.  (... I know...I know... The stuff is so bad for me... yet so delicious and refreshing!)  No surprise-- I couldn't sleep last night!  I love to craft late at night-- so I was in hog heaven!  The house was so quiet-- just my soft music and the funny sounds Mister G makes while he's dreaming.  

My "Aunt" Michelle gave me some beautiful flat cards that are perfect to turn into Thank You cards!  (I'm going to hand-write "dear" by the person's name and "love" by mine, and write my thank you message in the center... I didn't take pictures of my finished, written cards-- but believe me! They are so cute after they got their words!) 

I bought this Martha Stewart Christmas Custom Stamp Setting Set at Michael's this week on clearance for $4.49!!!  Martha sells non-Christmas Stamp Setting kits-- but this lady loves a deal!  The kit came with two round stamp mounts and all sorts of letters and numbers-- as well as Christmas things like TO:, FROM:, Merry Christmas, snowflakes, etc...  
I had never used a stamp mount before and really liked it.  You pick out all your letters, fix them to the mount, and then stamp your whole message.  I couldn't find a pigmented stamp pad-- and using the embossing gun in the middle of the night isn't really an option.  I used my Martha Stewart Arts and Crafts Markers to color onto the stamp-- and it worked beautifully!  

I'm so happy with how my thank you's turned out!

The flat cards came with envelopes-- but I'm tempted to make some handmade ones to mail them out in.

Learn how to make DIY Envelopes with these easy tutorials.


If you make some thank you cards or envelopes-- be sure to share some pictures on Twitter @MisterGandMe !

If you are too busy to make thank you cards, but you still want to send homemade-- check out my Etsy Shop!  I'm offering 20% off to Mister G and Me readers with the code JANUARY at checkout!  

xoxo,
Ashley

Thursday, December 29, 2011

DIY Envelopes

I feel super blessed this year to have been able to spend time with family and friends--and grateful too for the gifts I've received.  It's time to start thinking about sending out Thank You cards.  Here are some great tutorials on how to make your own envelopes.  

If you don't have time this year, bookmark this post for next year and be sure to check out my Etsy shop for some beautiful cards!)
"Dressing Up" Your Envelope
Doily Envelopes
easy peasy envelopes...
Coming to terms with book murder

Monday, December 19, 2011

Ocean Ornaments Tutorial

To make a beautiful Ocean Ornament of your own, you will need:
Paint-- white and shades of blue
Paint brushes
Sponge
Flat ornament-- glass or plastic.  I bought mine at Michaels
Sand-- I brought some home from the beach, but any craft store should have sand.
Strong Glue (Optional)
 First paint your horizon 1/3 of the way down on the ornament.  
 Paint a line below the horizon in a different shade of blue.
 Continue painting lines in different shades of blue to create your ocean.  Use your sponge to create the tide about 2/3 down from the top of the ornament.  
Fill your ornament 1/3 full with sand.   
Optional: You can put a small amount of strong glue to the cap of the ornament to permanantly seal it closed.  This will avoid any sand spillage when you store it away for next year!  
I have a Martha Stewart stencil that says "Merry Christmas" -- you could stencil or paint a holiday sentiment or maybe the name of the beach your sand is from.  

Post pictures of your ornaments on Mister G's Facebook page or twitter @MisterGandMe 
Merry Christmas!!  

Tuesday, December 6, 2011

Holiday Wreath

I have seen so many beautiful holiday wreaths floating around online.  All the inspiration was making me (and Mister G) pretty excited to make one!! 

I gave my wreath a lot of thought before getting started.  I wanted my wreath to be festive-- but also not too classic Christmas.  I was envisioning something "ocean-y" since it's our first Christmas living in a warm climate.  I also came up with the genius idea to incorporate Marquette colors into the wreath to get John excited about it!  (Pretty easy because Marquette baby blue is very ocean-y and also gold is very Christmas-y!)

I picked up a lot of holiday jazz at Micael's--by the way, now is a great time to get a deal on wreath fixins!  I chose golds, silvers, blues, and greens.  When I came home Mister G was nipping at the bag and trying to play with the picks.  

Remember when I made the homemade holiday ornanments?  While I was spray-painting my baby pine cones for the ornaments, I also painted a few big shells gold.    
The big shells needed special help to stay on the wreath.  I cut a piece of yarn and hot glued it to the back of the shell.  One big glob in the center and a line to each side to help the shells lay flat.
After the glue dried, I arranged the shells and tied the yarn tightly around the wreath.  Then I added the rest of my items.  It gets pretty windy at times here-- so I used a dab of hot glue on the bottoms of each pick before I stuck them into the wreath.

I love the sea urchin looking flowers next to the poinsettia!  If you take a close look you will see some baby pine cones too.  
I don't have a wreath hanger yet, so until I pick one up the wreath will be hanging under our house numbers.  See her to the left?
Have you made a wreath this year?  Plans to make one?  Share your pictures on Mister G's Facebook page or Twitter @MisterGandMe .  

Monday, December 5, 2011

Husband Wife Craft Night


Yes, you read that right.  Co-Crafting!
Christmas came early this year!  This Saturday, after watching Marquette win against Wisconsin, John was in an especially good mood and joined me for a night of crafting!  I can't really share what we co-crafted because a lot of it will be gifted-- but it was amazing! It was seriously so fun to work on a craft project together.

Do you craft with your love?

Thursday, December 1, 2011

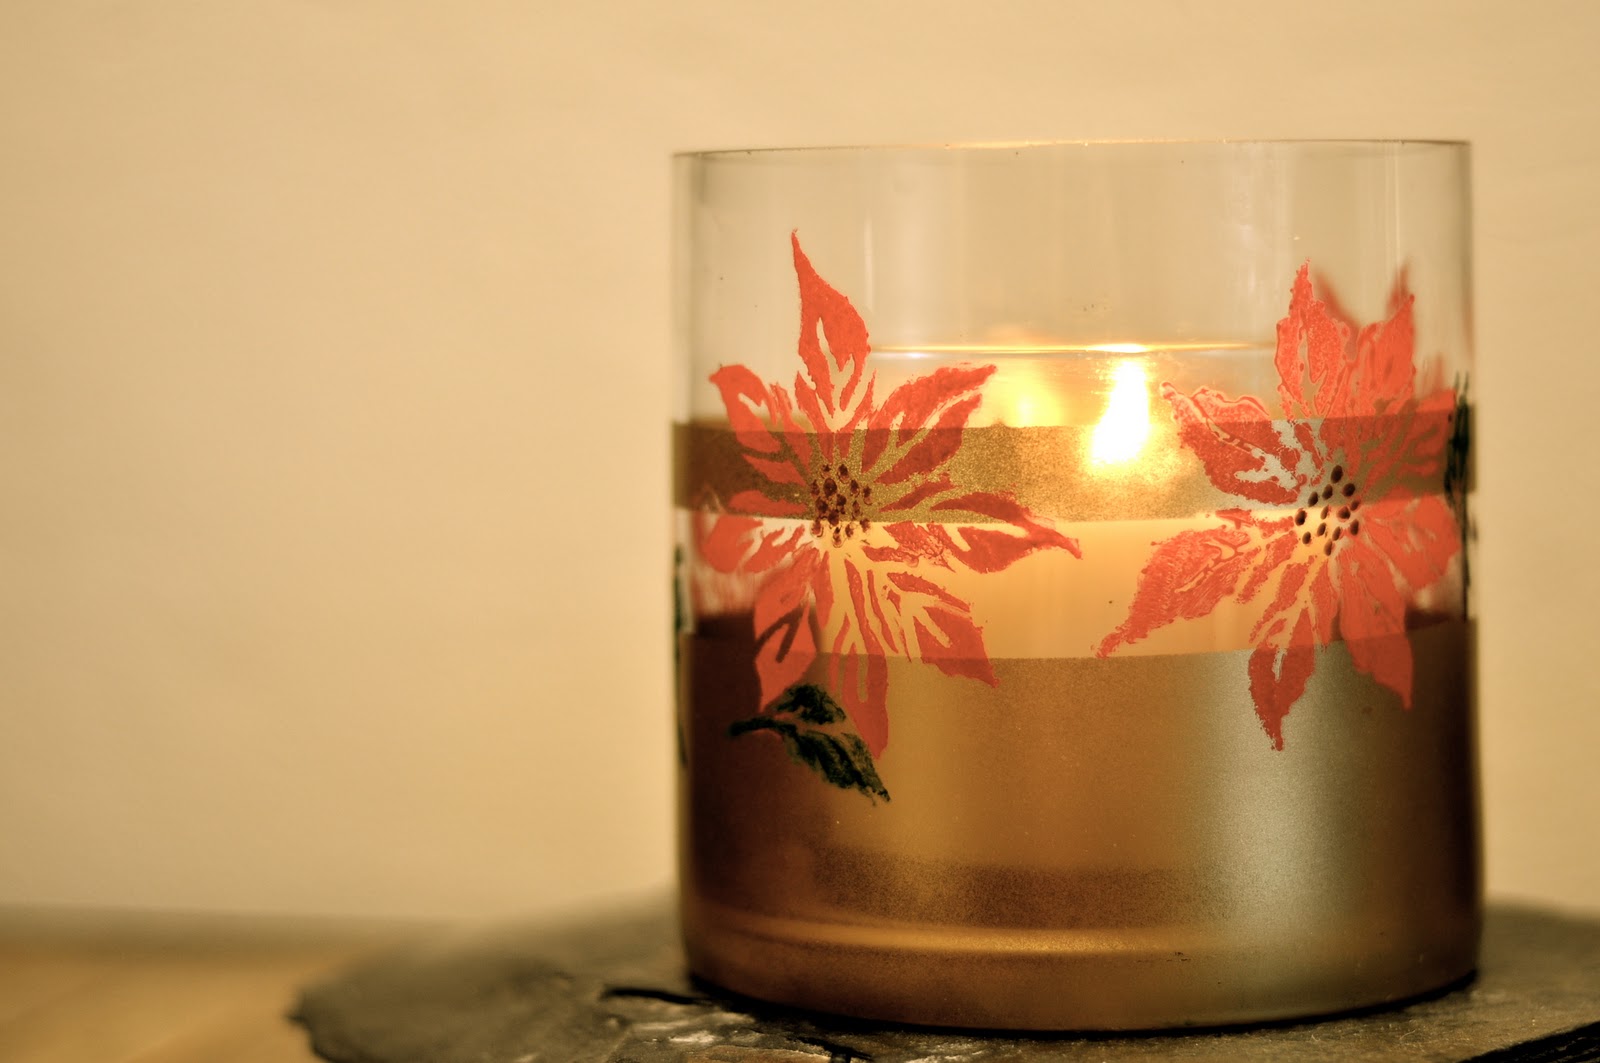
Holiday Poinsettia Hurricane Vase


I made this candle vase today following Martha's tutorial for "Holiday Harvest Hurricanes" .  Martha's features autumn leaves and while Thanksgiving came and went-- I'm ready for Christmas!

This is such a beautiful project!  If you buy the stencil kit, you can make one for every season!

A few tips:
**Seriously-- splurge for the Martha products.  I cheaped out on the paint and tape and I was sorry.  I used regular acrylic paint and it was difficult to get a rich, even coat on the glass.  Also, my masking tape peeled up part of the spray painted surface.  I have a feeling the Martha stencil tape would have been a wise investment!
**If you live in a warm climate-- don't stencil in the sun!  The spray paint part got a bit sticky and blemished.

What Christmas crafts have you been working on?

Monday, November 28, 2011

Homemade Ornaments

We put up our tree last night- and I wanted to make a few ornaments.  I had a can of gold spray paint laying around and some perfect small things for ornaments.  

 Some baby pine cones from the beach
A few buttons
A leaf and a piece of my backyard palm tree

I strung them with floss and hung on the tree.  
 I made an adorable garland with the baby pine cones.  
 Remember the felted acorn ornaments?  
Have you made any ornaments this year? 

Tuesday, November 22, 2011

DIY Picture Frame Tutorial

I saw this cute picture frame and pen organizer at TJ Maxx.
If you want to make your own frame you will need:
Old magazines
Picture frame-- ugly or scratched ones are perfect
Glue

Decide what kind of pattern you would like.  The TJ Maxx frame switches directions which is lovely on a square frame.  I had a rectangular frame and decided that horizontal magazine roll-ups would look best.  

Cut or rip your magazine pages to the width desired.  Then roll up the paper until it is as thin as you would like.  I found rolling it into a diagonal piece was easier to get a super thin roll.  

After you roll up your paper, glue it to the frame.  I worked from top to bottom and was happy with my finished frame.  

Friday, November 18, 2011

Craft Break: What's for Lunch?

I haven't talked about Mister G in a minute.  Well, lately the weather has been really nice and he has been spending a LOT of time in the backyard.  He loves chasing the tiny lizards about and has a new best friend that lives next door.  They are so cute together-- they even kiss each other through the fence!

I have been super productive so far today-- and hopefully will continue to be.  I made a list of things I have been putting off and crossed them off my list one at a time.  Once my list was finished, I took off my secretary hat and it was time to craft.  As I have mentioned before, I am opening my Etsy shop next month.  I am so excited!  I have so many things to finish before the grand opening!

I swear nothing works up an appetite quite like hours of crafting.  I wanted to share a yummy recipe with you that my friend Jessica gave me.  I call it orange-ginger-peanut stir fry.  Very creative, I know...

For one hungry crafter you will need:

1/4 cup Basmati rice
1/2 cup salted water-- with (optional) a little splash of oil
1+cup raw veggies-- today I used fresh snap peas, mushrooms, carrots, and onion.
Rice vinegar
2 tbs orange juice -- I recommend squeezing an orange and using fresh juice
1-2 tbs peanut butter
1 tbs fresh chopped peeled ginger
1 tbs brown sugar-- I added this part, but in all fairness Jessica gave me the recipe while we were on a cleanse.  I'm sure she would approve.  

For your rice:  Boil your salted water, threw in your rinsed basmati rice and stir it while it boils for 1 minute.  Then cover your rice and let it simmer for about 20-25 minutes.  I always forget to set my timer, so I checked on the rice when I thought it was about done.  Fluff it with a fork and take a taste.  If it's still a little crunchy, let it cook a bit longer

Cook your veggies.  I used a tiny bit of oil and stir-fried my veggies.  I always start with my densest veggies (like carrots) and as time goes on add the lighter veggies (like mushrooms).  Add a splash of rice vinegar if you like

To make the sauce:  Mix your peanut butter, chopped peeled ginger, splash of rice vinegar, orange juice, and brown sugar together.  Take a taste and see if you need to add a little extra of any of the ingredients

Combine your rice, veggies, and sauce and enjoy!  


Thursday, November 10, 2011

Crafting with Pet Fur: Yay or Nay?

The concept of crafting with pet hair begs the question-- why am I so grossed out by crafting with pet fur, yet I will literally rub skeins of yarn across my face in the yarn store "oohing" and "aahhhing" about how luxuriously soft it is?

Have you heard about fur felting or crafting with pet hair?  

Here's the basic idea:
You brush or trim your animal's hair and collect it.  If your animal doesn't like to be brushed or groomed, you pick their hair off of the carpet or floor and save it.  After you have amassed a sufficient quantity of pet hair you can felt it.  If you collect enough fur you could make a sweater for yourself!  

What do you think?  Does crafting with pet fur get you excited or make you want to throw up?  

You know what they say... Don't knock it til you try it.  So I did.  
Mister G dislikes being brushed, bathed, and groomed.  Plus, the idea of looking for Mister G's fur under side tables and picking it off the carpet to collect and craft with is just gross.  (Besides, those specimens are all dusty and are embarrassing!  Everyone has a few dust bunnies-- but who wants to save them??)

I lured G into the bathroom, gave him a trim, collected his fur, and wet felted it like this tutorial suggests.

Exactly as I suspected... I am not into it.  My biggest complaint (besides husband John giving me a very, very weird look) is that it doesn't feel good in your hands.  Texture plays a big role in my love for fiber arts.  Yarn and wool roving feel so rich in my hands.  G's usually very soft fur felt grainy and gritty while wet.  Several times while felting I had tiny dog hairs on my lips and even inside my mouth.  I conducted my felting business at the kitchen sink and stray fur found its way into my pots and pans and down the drain (despite my best attempts to keep it contained in the drain strainer).  In short, it was gross.      
Most of the buzz I have read online is about crafting with cat hair.  I happen to be allergic to cats-- so I will take everyone at their word that cat crafting is an enjoyable process.  

At the end of the day, from my toils came this truly beautiful felted garland that I decorated Mister G's crate with.  (Don't worry, I took it down so he won't choke on it).  Although the process was unpleasant, it's kind of cool to have a craft that once was part of my sweet crafting companion.  

Interested in learning more about crafting with your pet's coat?  
Crafting with Cat Hair  by Kaori Tsutaya, translated by Amy Hirschman is a book that explains, well, crafting with cat hair.  You can preview 26 pages of the book on Amazon.  Whether you love the idea of cat crafting or are repulsed by it-- you probably won't want to miss taking a peek inside this book.  

If you don't want to buy the book and are still curious like a cat about crafting with fur-- this tutorial for felted pet hair beads explains fur felting pretty well!  
I want to know what you think about all of this!  Leave a comment, post on Mister G's Facebook page, or tweet me @MisterGandMe.

Thank you to Quirk Books for permission to use their image.  

Wednesday, November 9, 2011

Felting Acorns and a Very Lovable Life Sized Felted Squirrel


I can't think of a better fall craft than the felted acorn!  I really enjoyed making them and I think you will too!  

If you are interested in making a few, check out this tutorial-- or if you're more of a visual learner, click here to watch a video tutorial.  

If you're too busy or you just can't add another new craft to your life-- you can buy some handmade acorns on Etsy.  I especially LOVE these felted acorn earrings by Dianthusa.  Check out her Etsy shop!  Her felt jewelry is just gorgeous and it's handmade in Paris!


Here is a great collection of acorn craft inspirations and some lovely tutorials as well!  
With all of your new felted acorns and other acorn crafts, it might be nice to have a felted squirrel around!  This amazing life size needle felted squirrel was made by a woman named Barbara and is for sale in her Etsy shop, feltedheirlooms.  Barbara has a lot of really cute felted animals in her shop-- the dogs are my favorite!


Thanks for reading my blog today.  I would love to see your fall crafts!  Send me some pictures of what you're working on!  You can post pictures of your work on Mister G's Facebook fan page or Tweet me @MisterGandMe.

xoxo,
Ashley


Photo Credits:  1 Mister G and Me,   2 and 3  Dianthusa,  4 and 5 Barbara Crowther

Monday, November 7, 2011

Newborn Knit Legwarmers for Baby Ivy

Baby Ivy's One Month birthday was on Saturday!-- so I knit her up a fancy pair of leg warmers.
My sister Meg and little Ivy live in Wisconsin and it gets pretty cold there!  Brrrr.... I knew Ivy's precious little legs would love to keep cozy in some super soft baby alpaca leg warmers!  
I followed this pattern from Hippie Stitch.  I used baby alpaca yarn in cream and merlot.  
Mister G loves when I knit!  He likes to snuggle up on the couch with me and watch 30 Rock.  Here are my finished newborn leg warmers.
When I learn to crochet, I hope to make myself a pair similar to these amazing leg warmers from Free People.  I'm thinking a cream color or maybe even mustard!
 
Fashion Trend © 2011 | All Rights Reserved | About | Privacy Policy | Contact | Sitemap